|
[as of 4-21-06 the engine is sold]
I call it the ERE#4 (Ellwein
Racing Engine #4). It's a .040" over LT1 block decked to 9.000". The rotating assembly is all forged with an
"Ohio Crank" 4340 crank, H-beam rods, JE/SRP flat-top
pistons with Oliver splayed main caps at 2, 3 & 4 with ARP main
studs. I'm waiting on a set of sprio-locks to arrive from
Summit and then I can finish the assembly and verify piston deck
height. I have my own solid roller cam installed for test
purposes but if you buy this short block I will install and degree
any cam you desire. The short block does not come with an oil
pump but I can install any pump and pan that you desire if you
supply the parts. I do plan to test this engine either on a
friends engine stand or in one of my cars to verify proper ring seal
and general health. Since this is the 1st engine I plan to
sell to the general public I am offering a lot of the extra effort
$Free$.
This will help spread the word about Ellwein Engines.

This is the finished product as of 4-21-06:
Timing gear is included but my cam is not included. I can
install your cam and degree it if you desire, at no cost to you.

Not a very glamorous photo but it shows the business end splayed
Oliver caps with 4340 forged crank and rods. If you are
spending the bucks, and for the ultimate in reliability, let me
suggest a Titan gerotor oil pump. ($400.00). I have one in
ERE#3, (see further below in this page), and that is the only pump I
will use for any of my personal engines in the future. Yes it
cost way too much but so does everything involved with a
"race" engine. 
On 4-23-06 I fit up a Stef's oil pan to prepare for running the
engine on a test stand. Nabil Guffey is going to help me
construct the test stand right here at the 399 Race Shop. All
you need is 12 volts, an EFI fuel pump with fuel supply, a cooling
system and engine wire harness. I'll hope to be able to listen
to make sure the pistons don't slap too much, (even though they are
forged), and check for ring seal and oil leaks. The crank very
slightly rubs on the oil pan rail right now, (it's not the rods), so
I guess I need to fix that prior to running it.
Ellwein
Racing Engine #4 assembly and parts detail:
The block is from my first LT1 383 which was
purchased from Agostino Racing Engines. I have been using it
for the past 7 years off and on and have reassembled it numerous
times with a fresh hone and other parts as needed. In 2005 I
made a tuning mistake and gave the motor way too much spark advance
and thus rattled the pistons to death. The block was then
bored 0.040" over and decked to 9.000".
Parts cost:
GM LT1 block: $Free$
Ohio Crank 383 KIT: $1699.00
Oliver splayed main caps: $199.00
Cloyes timing set: $80.00
Cam bearings and plug kit: $50.00
ARP main stud kit: $90.00
Total parts: $2118.00
The Ohio Crank 383 Kit consist of:
Race coated bearings
Total Seal file fit rings
3.75" stroke 4340 steel crank
6.0" H-beam rods
JE/SRP forged pistons
internal balance
Machine work:
Bore & hone to .040: $120.00
Deck block: $150.00
Clean block R&R cam bearings and galley plugs: $250.00
Fit splayed caps and align bore/hone: $500.00
Total machine work: $1020.00
Internal balance rotating assembly: $300.00
Machine crank and add balance slugs: $250.00
[I paid Ohio Crank $125 to neutral balance the 383 kit. It
arrived balanced "external rear" unfortunately. I
had the rotating assy. rebalanced locally. They added 3 slugs
of mallory and removed metal in key locations of the crank. I
had no experience with Ohio Crank's balance work and it was a good
thing I double checked their work]
Assembly,
blueprinting, stroker clearancing:
$Free$
Why buy an Ellwein Engine?
For the last 7 years I've been assembling LT1 engines for my Impala
SS racing hobby. I enjoy engine building and would like to
begin building for the general public. Although professional
engine builders can offer the same parts and machine work quality
for almost the same cost, I can offer a great amount of attention to
detail during assembly that some professional shops cannot offer,
(unless huge $$$ is paid).
Here are examples of other
projects

#2 on left has a cast SCAT crank, stock main caps, stock impala SS rods and Lunati
pistons .
#3 is my best engine and is bolted together with a forged OHIO
crank, Milodon splayed 2/3/4 main caps , Eagle H-beams and Mahle
flat top pistons.
LINK
to ERE#2 web page
LINK
to ERE#3 web page

And how about some name
dropping.
That's Lennart Bergquist: The
2005 Popular Hot Rod Magazine Engine Master's Champion. He let
me hang out around the Autoshop Racing Engines facility for a few
days.
Here is a good link to one of many magazine articles featuring
Autoshop:
LINK

This is the engine I assembled in 2005 that is now my best and
favorite engine, (ERE#3). Notice
the Titan brand gerotor oil pump. That pump has no equal as far
as providing reliable oil supply and pressure. No it is not included
with the ERE#4 but I can install one if you pay for it. Be
aware that this pump only fits with a few oil pans, (Billet
Fabrication and Stef's).
The Milodon splayed caps are what really
strengthen the whole assembly and increase bearing life. I've
run 11.096 @ 122 all natural and 10.301 @ 132mph on 175hp nitrous
with this bottom end and GMLT4 heads and street solid roller
cam. I try to duplicate this engine for all of my future
"race" engines. I define a race engine as one with
splayed caps and forged rotating assembly. I will build
"street" engines in the future that will have low cost 383
rotating assemblies and stock main caps with high quality piston
rings and bearings. I feel that nothing more than that is
needed for street engines.
|
Assembly raw detail:

H-beam rod/Spiro Locks/JE-SRP flat top .040"

3.75" stroke 4340 Steel crank after "re-balance"

Test fit of Oliver splayed caps

Test fit of crank

Cap studs at 70ft-lb, outer bolts at 65ft-lb

I plasti-gauged each main cap.

Ready to install piston rings (Total Seal file fit).

File fit process

I check the ring 1'"down and then 1/2 way down

Here is the 1" check

Here is the 1/2 way down check

Top ring at .022", 2nd ring at .023" for street/strip mild
nitrous.

Storing rings until installed on pistons

Cloyes CLO-9-3145 from Summit.

Spiro-Locks, 2 per side of piston pin.

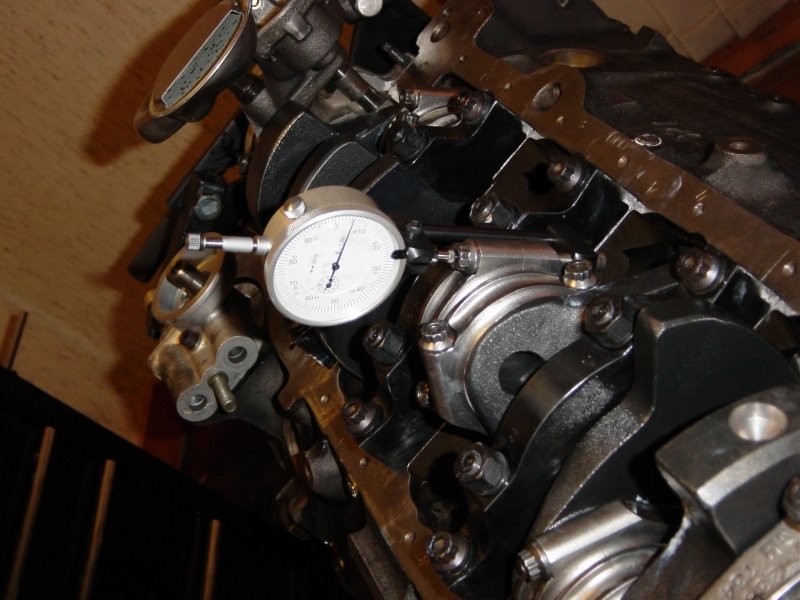
Pistons all in. Rod bolt stretch check.
ARP 2000 7/16" bolt = .0066" spec.

I torqued all bolts to 80ft-lb and got from .005 to .007"
stretch per bolt. ARP molly lube used.

Here is where my machine shop slightly goofed.
Pistons 1,3,5,7 are .006" out of the hole.
Make sure to use a head gasket with at least .041" thickness.
(GM LT4 #12551488 = .043")

Pistons 2,4,6,8 are at exactly 0.000"
Please note this and adjust with head gaskets.
(I'd use the Fel-Pro .039" gasket on this side)
 . .
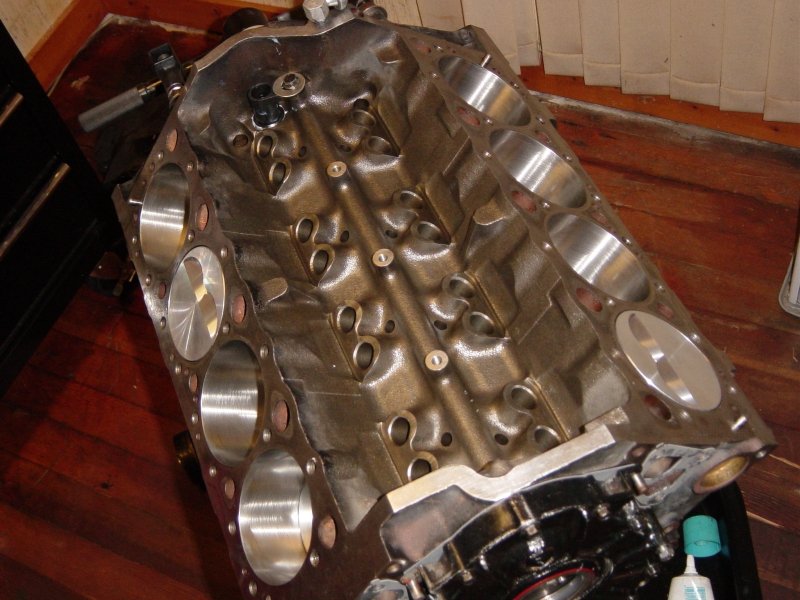
The finished short block. The timing cover is installed for
dust prevention and to help me paint the block.

Now it's time to paint the block!. I also put an oil pan on to
check for rod clearance. This pan does not have
"stroker" notches. The rods do rub the pan rail
slightly. This pan might work with minor
grinding/clearancing. I would suggest a pan with stroker
notches.
 
4-21-06: Just painted the well seasoned LT1 block with VHT
hi-temp 500f engine enamel. SP-997 Cast Iron.

In preparation for installing the oil pan gasket and oil pan I'll
clean the block and gasket and oil pan with brake clean and use my
favorite RTV shown here in the picture. Permatex The Right
Stuff.

With the pan gasket on I can see if it needs to be clearanced for
the rods. Nope. None of the rods come close to the oil
pan gasket. What was rubbing a few days ago when I had this
pan on for photo purposes?

RTV is on the gasket top and bottom. I wouldn't have to do so
much RTV if using a stock oil pan. For some reason this Stef's
pan is hard to seal.

Now I hope the rotating assembly moves freely. Nope. It
rubs the pan for about 20 degrees of crank movement right here where
I have the rotating assembly wrenched to. I'll take the pan
off and certainly I will be able to see the rubbing component.

Ah Ha! It's the crank counterweight hitting the oil pan.

I ground on the oil pan and reinstalled it. Well it still rubs
just a tiny bit. Tool late now to take the pan off. The
RTV is solid so I'll take the pan off later and scrape the RTV and
grind more on the oil pan. I primered and painted this timing
cover flat black.
|